
SUMMARY:
Standard file deletion does not fully remove data and often leaves behind recoverable traces that put sensitive information at risk. This guide explains what data remanence is, why deleting or formatting files is not enough, and which best practices ensure permanent file removal. You’ll learn five practical steps for securely deleting files, managing free space, and automating erasure tasks. The article also shows how BCWipe 7 helps individuals and organizations permanently eliminate residual data, strengthen privacy, and support compliance with regulations such as GDPR.
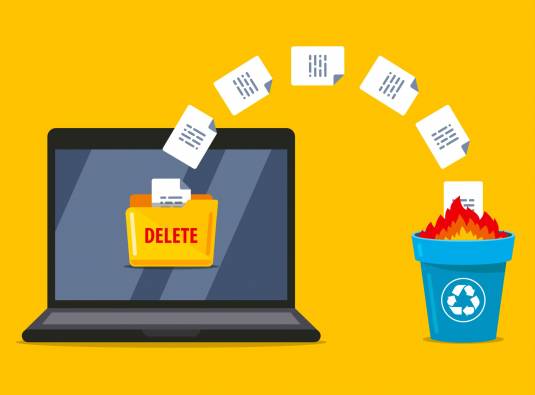
When you delete sensitive data from your computer, are you sure it disappears for good? If you ‘erase’ files by moving them to the Recycle Bin and then emptying it, there will be a lasting trail of data that remains on your hard drive. This residual data, or data remanence, can then be recovered by third parties by using widely available file recovery software.
To avoid your private data falling into the wrong hands, this guide will provide step-by-step instructions on how to permanently delete files with BCWipe 7 and ensure your computer stays clean.
5 Best Practices for Wiping Files
Here are our 5 best practices on how to delete files permanently, complete with step-by-step instructions. By following these 5 steps, users will be able to boost their privacy and keep their computers clean. For businesses, deleting sensitive files in the correct way will reduce the risk of data breaches and help you to stay compliant when it comes to GDPR and other regulations.
If you don’t have BCWipe 7 yet, you can still follow our best practices by starting your free trial today.
Step 1: Delete Files Using Data Wiping
Instead of ‘deleting’ files by normal means, a secure and permanent way to dispose of sensitive information is to erase the files with data wiping software. With BCWipe 7, this is possible with both traditional hard drives and solid-state drives (SSD).
In addition to our step-by-step instructions, you can also check our YouTube tutorial on deleting with wiping.
- Launch BCWipe Task Manager
- Click the ‘Add Task’ icon

- Enable ‘Delete with wiping’ under the Wiping commands tab
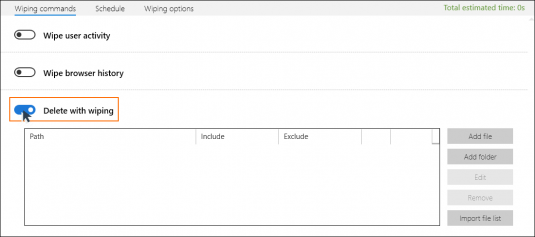
- In the ‘Delete with wiping’ section, click ‘Add file’
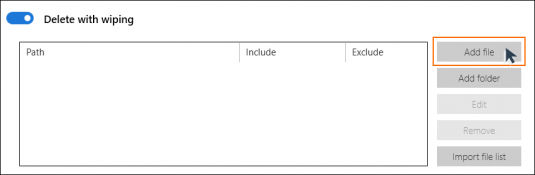
- Browse and select the data you want to wipe and click ‘Open’
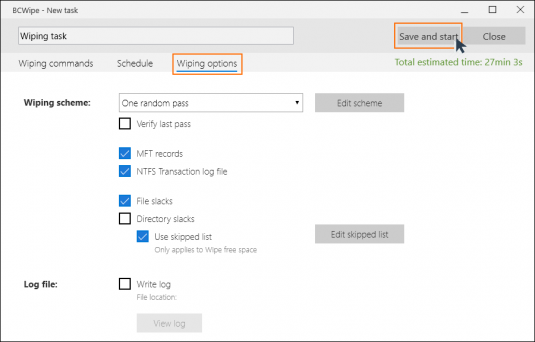
- Start the process by clicking ‘Save and start’
NOTE: BCWipe will erase these files beyond recovery, so always make sure you have picked the right files!
Before clicking ‘Save and start’, you can also check the other tabs. Select ‘Wipe options’ to switch between wiping schemes and enable a logging function to record what was deleted. We will take a closer look at the ‘Schedule’ tab in step 5.
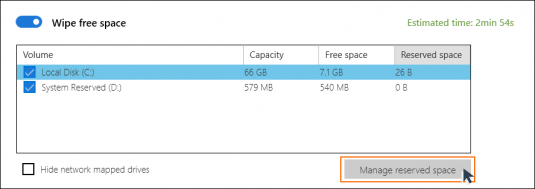
Step 2: Wipe Free Space to Remove Residual Data
Free space is a type of data remanence that continues to exist on computers after common activities, such as ‘deleting’ files by normal means or moving them. To securely delete files and ensure that none of their information can be recovered by third parties, free space must also be wiped.
By wiping free space, everything on the drive that doesn’t contain an active file will be overwritten, including cells that were completely empty.
NOTE: This step is a must for SSD users. Wiping free space also highly recommended for users with traditional hard drives to get rid of data remanence.
Watch our video on how to wipe free space with BCWipe.
- Enable ‘Wipe free space’ command
- Select the drive where the previously deleted files reside

- Under the ‘Wiping options’ tab, choose the wiping scheme and other detailed options
- Click ‘Save and start’ to start the task now
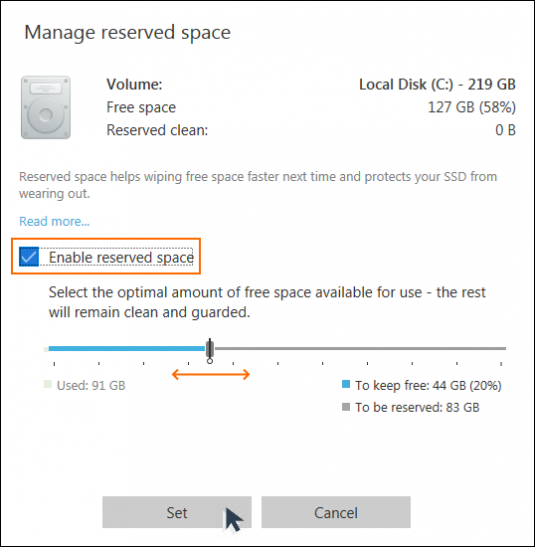
Step 3: Optimizing Free Space Wiping with Reserved Space Manager
BCWipe 7’s Reserved Space Manager allows you to significantly reduce the amount of time it takes to wipe free space. This feature works by preserving sections of wiped space in a clean state, which eliminates the need to wipe these particular parts every time. You can activate Reserved Space as part of the ‘Wipe Free Space’ command from step 2.
NOTE: When your hard drive starts to get full, the Reserved Space Manager will automatically reduce the size of your reserved space, making more free space available to be used for files. You can also manually adjust the amount of reserved space at any time. After deleting a large amount of data, for instance, you could increase the size of your reserved space to ensure it’s even faster to run the ‘Wipe Free Space’ command.
- Go to the ‘Wipe Free space’ section
- Select a drive from the list
- Click on ‘Manage reserved space’
- Check the box to ‘Enable reserved space’
- The slider will jump to the recommended value; drag to adjust if needed.
- Click ‘Set’ and proceed with the wiping task; reserved space will be assigned after the task is completed
Step 4: Automated Protection with Transparent Wiping
Many applications create temporary files (TMP files), cache objects, shadow copies or other system files that may contain sensitive information. BCWipe 7’s Transparent Wiping feature works in the background to automatically wipe all traces of these files, as well as the contents of your Recycle Bin when they are being deleted.
Using the Transparent Wiping feature is a great way to effortlessly improve your security. Check our YouTube tutorial on how to enable Transparent Wiping with BCWipe.
- Open BCWipe Task Manager and select ‘Transparent Wiping’
- Click the toggle switch to activate ‘Transparent Wiping’
- 14 wiping schemes for automated erasure are available
- You can use advanced options of ‘Transparent Wiping’ in ‘Exceptions’ tab
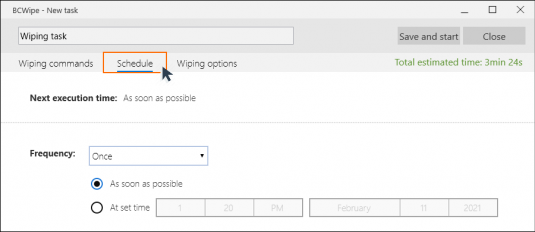
Step 5: Scheduling Wiping Tasks for Ongoing Protection
BCWipe’s Schedule feature allows you to automatically wipe files and free space at a set time or on a regular basis, whether that’s daily, weekly, monthly, or whenever the computer is turned on or off. Using this feature is recommended for users and administrators who want to save time and get organized by automating wiping tasks.
- Click on the ‘Schedule’ tab when creating a new wiping task
- Here you can select the start time, frequency and preconditions of the task
- In addition to regular scheduling options, you can also set the task to start at user logon, at startup, or at user logoff/shutdown
- Once you have scheduled the task, click the ‘Save’
Now you know about our 5 best practices for wiping files, why not discover some more new features in BCWipe 7? Check out how you can permanently delete your browsing history, wipe deleted files from your hard drive and permanently delete shadow copies.
Happy Wiping!
Frequently Asked Questions (FAQs)
When you delete a file using the Recycle Bin or standard operating system delete functions, only the file reference is removed, not the actual data. The underlying information remains on the drive as residual data, known as data remanence, and can often be recovered with widely available recovery tools until it is overwritten.
Deleting files with wiping means overwriting the file’s data using a defined wiping scheme before removing it from the file system. This process ensures the original content can’t be reconstructed or recovered, even with forensic software. It’s the recommended method for disposing of sensitive or regulated information.
Deleted files often leave fragments behind in unallocated or free space on a drive. Wiping free space overwrites these leftover areas, removing residual data that could otherwise be recovered. This step is especially important for solid-state drives (SSDs), where remnants can persist longer due to how storage is managed.
Encryption protects data while it exists on a device by making it unreadable without the correct key. File wiping permanently removes data by overwriting it once the information is no longer needed. Most organizations rely on encryption for ongoing protection and use wiping for secure deletion and device hygiene.
BCWipe is specifically designed to securely delete files, folders, and free space beyond recovery. It also supports automation features such as transparent wiping and scheduled tasks, making it suitable for both individual users and organizations managing sensitive data under regulations like GDPR, as provided by Jetico.