
SUMMARY: This guide explains how to protect sensitive data on Windows 11 using BestCrypt Container Encryption and why container-based protection is more secure and more scalable than encrypting files one by one. You’ll learn how to create an encrypted virtual drive in five simple steps along with best practices for keeping your workflow safe, including wiping leftover traces with BCWipe so your files stay protected from creation to deletion.
There are two main methods to encrypt files on Windows 11.
Whether you’ll pick file or container encryption really depends on your protection needs.
As a general rule…
- File encryption lets you encrypt one file at a time.
This is the ideal solution if you need to protect just a few files, or if you need to send a sensitive file by email. - Container encryption protects many files at once.
This is the preferred choice if you need to encrypt groups of files together.

Most likely your computers are storing all sorts of sensitive data in more than a few files. So here we’ll show you how to encrypt files on Window 11 by using BestCrypt Container Encryption.
5 Easy Steps to Encrypt Your Files on Windows 11
If you haven’t yet installed BestCrypt, see our how-to video. The software is also available for a 21-day free trial.
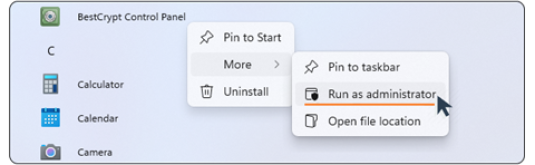
Step 1: Run the Software as Administrator
Once you have successfully installed BestCrypt…
- Go to the Start menu and click on ‘All apps >’
- Right-click on ‘BestCrypt Control Panel’
- Select ‘More’ and choose ‘Run as administrator’
- If prompted for elevation, click ‘Yes’
Step 2: Create Container
To create the virtual drive where you’ll store your sensitive data…
- Select ‘Container’ from the menu bar and then choose ‘New’

- Enter a container file path
OR
Select the ‘ellipsis button’ (the 3 dots) to browse for a specific location - Adjust the size of the container by using the arrows
- Enter a brief description (optional)
- Click ‘Create’
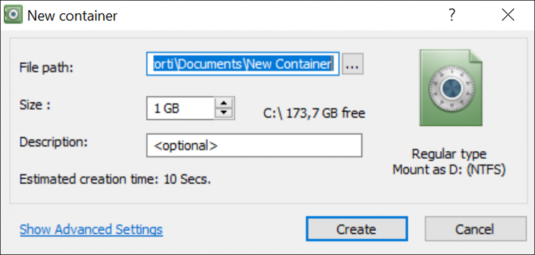
Before selecting ‘Create’, you can also change default settings or switch between encryption algorithms by clicking ‘Show Advanced Settings’. For step-by-step instructions, watch our dedicated how-to video.
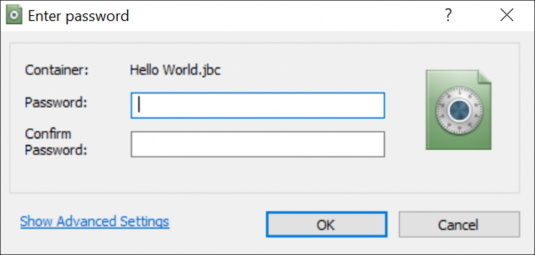
Step 3: Choose Encryption Password
It’s time to create a password for your container. Every time you access your encrypted container, this password will be requested. Be sure you don’t forget it! Here are some tips on how to create a strong and memorable password.
- Choose and enter a password (min 8 characters)
- Confirm the password
- Click ‘OK’
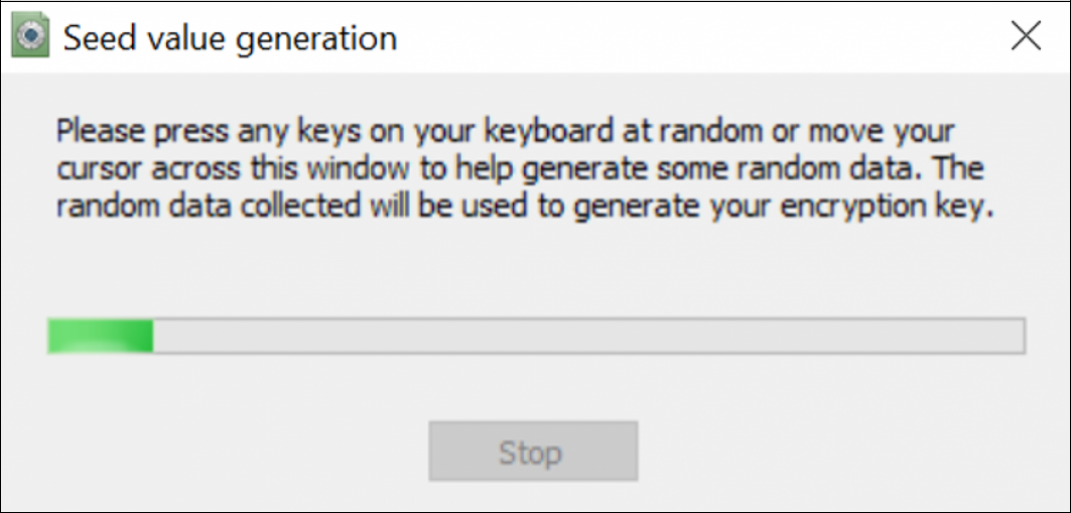
Step 4: Encryption Process
So-called ‘seed data‘ is needed to generate a random encryption key. To get random data for the seed, the program will display a dialog window, visualizing the encryption seed generation process.
- Move your mouse around inside the window
OR
Type anywhere on the keyboard - Continue until the green line reaches the end of the progress bar
Step 5: Add Files to Your Container
The container you just created will appear in Windows as another drive.
Now that your container is ready, let’s add some files. You can either…
- Create files from within your container
This is a more secure method. We recommend using it whenever you need to create a new file that needs protection. Simply right-click anywhere inside the container and select ‘New’. - Move existing files into your container
You can drag and drop existing files into the container. Files created outside of the container might leave traces of information around your operating system. To solve that problem, you need to permanently delete the original unencrypted files and then wipe free space.
According to NIST SP 800-88 Guidelines for Media Sanitization, residual data must be securely erased to prevent unauthorized recovery of unencrypted files.
Guidelines for Media Sanitization
Happy encrypting!
Frequently Asked Questions (FAQs)
File encryption protects individual files one by one, which is useful when you only need to secure a few items or send a sensitive file by email. Container encryption creates a virtual drive that encrypts many files at once, making it easier to organize and protect larger sets of documents under a single password.
Container encryption is ideal when you regularly handle sensitive documents or need to group protected files in one place. It offers consistent settings, strong long-term security and a simpler workflow for users who store or edit confidential information often.
Yes. Files created outside the container can leave residual traces on your system even after you move them inside. To remove data remanence permanently, wipe the original files and free space. BCWipe can securely erase these traces so nothing recoverable is left behind.
BestCrypt does not include backdoors or password-recovery features. This prevents unauthorized access but also means you can’t open a container without the correct password. Storing your password in a secure password manager is strongly recommended.
Yes. When files are created inside the container, no unencrypted temporary or residual traces appear on the system. This keeps your workflow cleaner and provides stronger protection for confidential data.
Related Articles
5 Benefits of Container Encryption vs. File Encryption
How to Take Back Your Privacy in the Cloud with File Encryption Software
How to Encrypt Data on External Hard Drives (Windows 11 & Mac)