
SUMMARY: In this guide you’ll learn how to protect sensitive data on external drives by encrypting the entire device with BestCrypt Volume Encryption. We explain when to use file-level encryption versus whole-drive protection and why encrypting the full device offers stronger security if a USB stick or portable disk is misplaced or stolen. Clear, step-by-step instructions for both Windows 11 and Mac help you secure removable media quickly and reliably.
Why should you encrypt data on external hard drives? Removable drives are practical tools for businesses everywhere. Thanks to their storage capacity and small size, they are a great way to transfer or view documents from one computer to another. Yet external drives and USB sticks are also easy to lose and, if not encrypted, sensitive information can easily be accessed by unauthorized people.

Industry best practices from NIST recommend encrypting all removable media to prevent unauthorized access to data at rest.
Guide to Storage Encryption Technologies for End User Devices
How to encrypt external hard drives? Generally speaking, there are 2 methods:
- Encryption of selected files and/or folders
This is the ideal choice if you need to access files from many different computers or when sharing is required. Review step-by-step instructions. - Encrypt the entire removable drive
This method is preferred when using a USB stick on the same few computers (i.e., home and office computers).
Encrypting selected files/folders can be convenient but has some risks. By encrypting a portion of the drive, chances are that a sensitive file could end up in the wrong location. For complete peace of mind, we’ll now show you 5 easy steps on how to encrypt the entire external hard drive on Windows 11 with BestCrypt Volume Encryption.
Under GDPR Article 32, encryption is highlighted as an essential safeguard for protecting personal data stored on portable devices.
Security of processing, Art. 32 GDPR
Skip here for instructions on how to encrypt external hard drives on Mac.
How to Encrypt External Hard Drives on Windows 11
Step 1: Run the Software as Administrator
If you didn’t install the software yet, do it now. Once BestCrypt is installed, select ‘Run as administrator’…
- Go to Start menu and click on ‘All apps >’
- Open the BestCrypt Volume Encryption program folder
- Right-click on ‘BestCrypt Volume Encryption’
- Select ‘More’, then ‘Run as administrator’
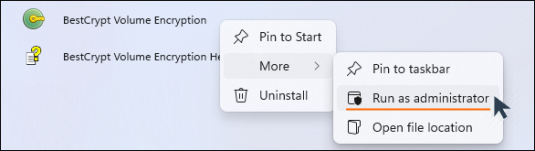
- Click ‘OK’ when asked for elevation
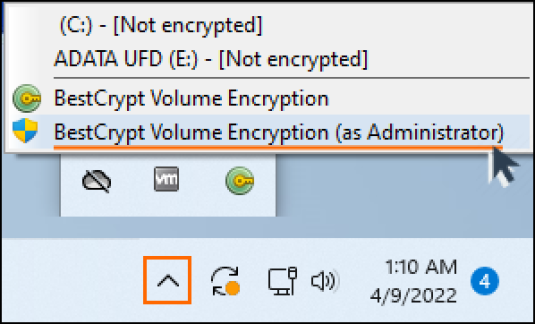
BestCrypt also resides in the system tray (bottom right corner).
- Click the BestCrypt icon
- Select ‘BestCrypt Volume Encryption (as Administrator)’
Step 2: Removable Drive Selection
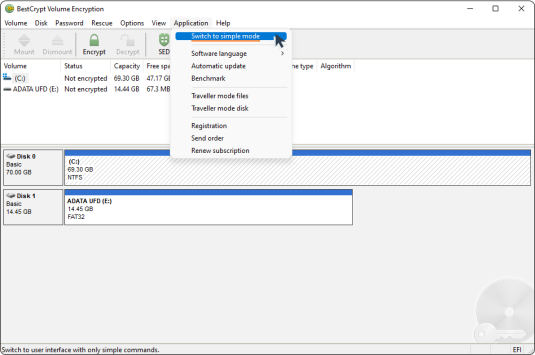
To get working quickly and activate your encryption in just a few clicks, use the ‘Simple Interface’. When you install BestCrypt, you can select ‘Simple Interface’ as the default mode. If the program ever opens in ‘Advanced Mode’, click the ‘Application’ menu item and select ‘Switch to simple mode’.
- Plug in the removable drive you want to encrypt
- Select your removable drive shown in BestCrypt
- Click ‘Encrypt’

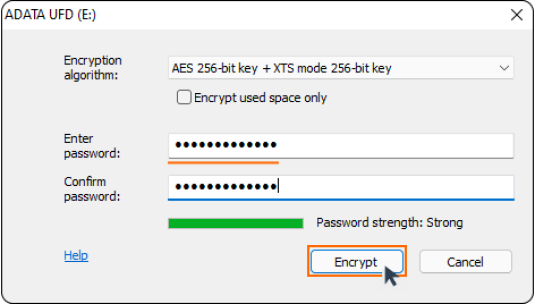
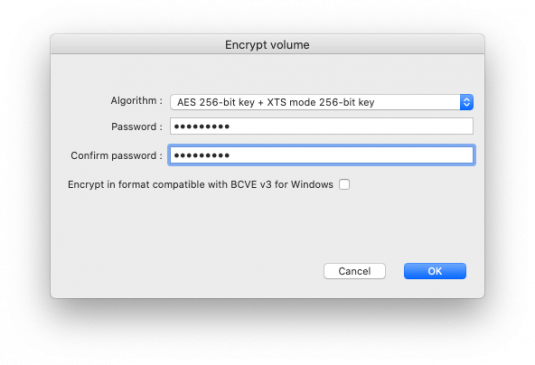
Step 3: Create Encryption Password
It’s time to create a password for your external hard drive. Every time you access your encrypted volume, this password will be requested. Be sure you don’t forget it! What makes a strong and memorable password? We offer tips here.
- Select an encryption algorithm from the dropdown menu – by default BestCrypt uses AES
- Choose and enter a password (min 8 characters) – as you are entering your password, BestCrypt will indicate its strength
- Confirm your password
- Click ‘Encrypt’
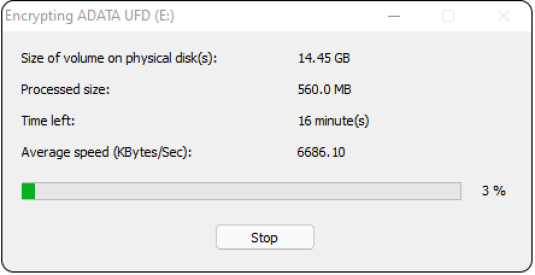
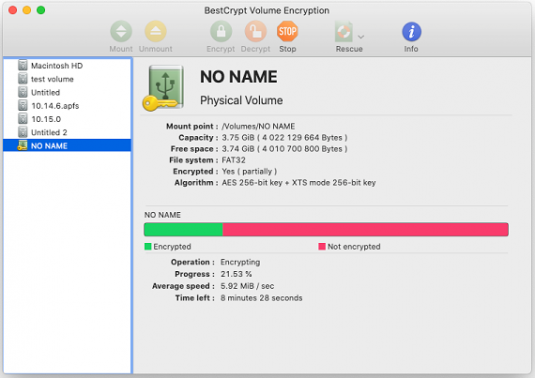
Step 4: Encryption Process
Now you can sit back and enjoy the show!
Once the encryption process begins, you will see a progress status window showing remaining time and percentage completed. At any time, you can click ‘Stop’ and continue again later.
When completed, you will see this prompt: ‘The encryption process has finished successfully.’
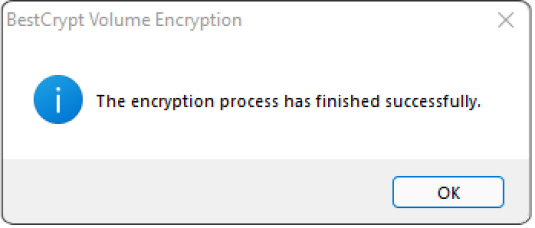
If you see anything other than the success message, please contact Jetico Technical Support.
Step 5: Save rescue file
Upon completion of the encryption process (unless stopped in the middle), BestCrypt Volume Encryption will automatically save the rescue file to provide you with access to your sensitive data in case of an emergency.
- By default, the rescue.rsc file is stored in the BestCrypt installation folder: C:\Program Files (x86)\Jetico\BestCrypt Volume Encryption\Rescue. Make sure to store a copy of this file in a safe place to ensure you have access to the recovery data even if your PC won’t turn on.
- Don’t worry, the recovery information in the rescue file is still protected with your encryption password.
How to Encrypt External Hard Drives on Mac
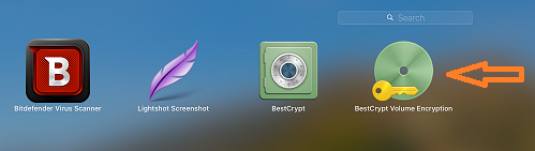
Step 1: Launch the Application
If you didn’t install the software yet, download BestCrypt now for free. Once BestCrypt is installed…
- Click the ‘Launchpad’ icon from the toolbar

- Open ‘BestCrypt Volume Encryption’ by clicking the icon
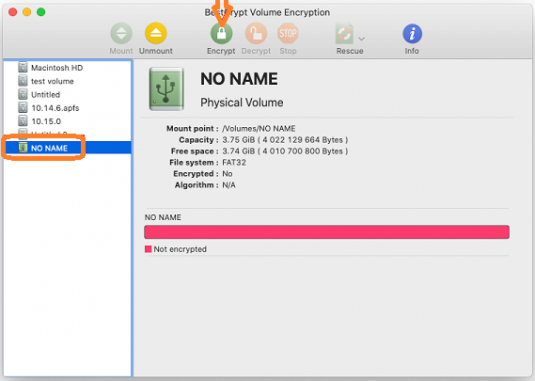
Step 2: Removable Drive Selection
- Plug in the removable drive you want to encrypt
- Select your removable drive shown in BestCrypt
- Click ‘Encrypt’
Step 3: Create Encryption Password
It’s time to create a password for your external hard drive. Every time you access your encrypted volume, this password will be requested. Be sure you don’t forget it! What makes a strong and memorable password? We offer tips here.
- Select an encryption algorithm from the dropdown menu – by default BestCrypt uses AES
- Choose and enter a password (min 8 characters)
- Confirm your password
- Click ‘OK’
Step 4: Encryption Process
Now you can sit back and enjoy the show!
Once the encryption process begins, you will see a progress status window showing remaining time and percent completed. At any time, you can click ‘Stop’ and continue again later.
Step 5: Unmount Volume
Upon completion of the encryption process, before ejecting the external drive, it is recommended to unmount the volume by clicking ‘Unmount’.
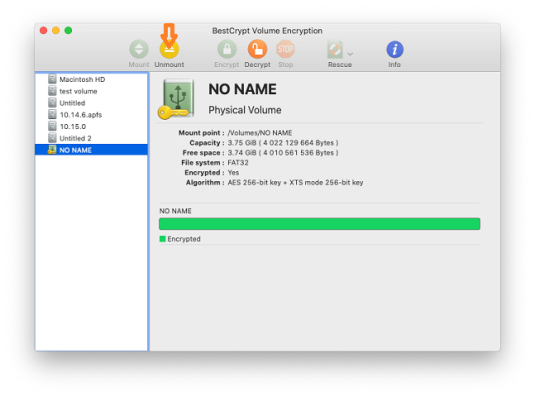
A soon as you unmount the volume, your encryption password will be required to access the data.
Happy Encrypting!
Frequently Asked Questions (FAQs)
External drives are easy to lose and without encryption anyone who finds them can read the files. Encrypting the device ensures sensitive business or personal data stays protected if the drive is misplaced or stolen. It’s a straightforward way to prevent unintended exposure.
Encrypting selected files is useful when sharing documents or working across many computers, but it also increases the risk of leaving something unprotected. Whole-drive encryption offers stronger, more consistent protection because everything on the device is secured under one process and one password.
BestCrypt Volume Encryption does not include backdoors so the data remains inaccessible without the correct password. The software creates a rescue file that can help restore access in certain situations. Store this file in a safe location that is separate from the encrypted drive.
Yes. BestCrypt Volume Encryption lets you stop encryption at any point and resume when convenient. This is especially helpful when working with large external drives that may take longer to encrypt.
If the drive previously contained unencrypted files, wiping is recommended before enabling encryption. Encryption prevents future unauthorized access, while wiping ensures old data cannot be recovered. BCWipe can remove residual traces from earlier use before you begin encrypting the device.
Related Articles
How to Encrypt Your Computer
How to Encrypt Files on Windows 11
How to Take Back Your Privacy in the Cloud with File Encryption Software