
SUMMARY: Clearing your browsing history in Brave removes only the visible records, but recoverable traces may still remain on your system. With BCWipe you can permanently erase cached files, cookies, saved passwords and other forms of data remanence that standard deletion leaves behind. You will also learn how to set up a custom wipe task so your Brave browser stays clean and private every time you use it.
Brave is an ideal web browser for privacy-minded users. Yet traces of your Internet activities can still be recovered even after clearing your browsing history. Learn more about 3 key benefits of permanently deleting your browsing history.
Even after users clear their browsing history, residual artifacts can persist on disk and be recovered with forensic tools.
National Institute of Standards and Technology (NIST), Guide to Integrating Forensic Techniques into Incident Response (SP 800-86)
In this blog we’ll show you how to permanently delete Internet History on Brave in just a few clicks with BCWipe.
How to Permanently Delete Internet History on Brave
Step 1. Install & Launch BCWipe
First, if you haven’t installed BCWipe, please do so. You can watch our how-to video to help. If you aren’t ready to commit, the software is available for free trial.
Step 2. Create a New Wiping Task
Once you have successfully installed BCWipe…
- Go to Start menu
- Select ‘BCWipe’ and click ‘BCWipe Task Manager’
Once ‘BCWipe Task Manager’ opens…
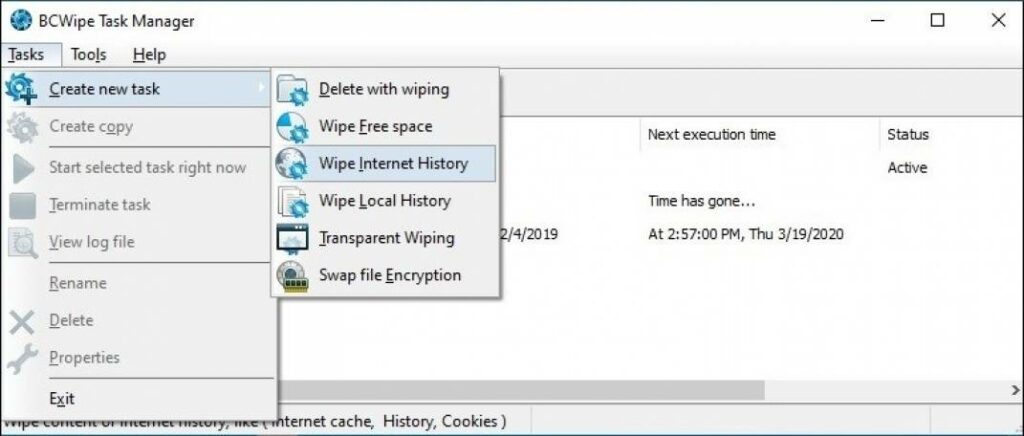
- Select the ‘Tasks’ tab from the menu
- Choose ‘Create new task’
- Select ‘Wipe Internet History’
Step 3. Select Brave Items to Wipe
- In the ‘Internet History’ tab select ‘Brave’
Or,
Select one or more items you would like to permanently remove, for example ‘Saved Passwords’, ‘Bookmarks’, ‘History’, ‘Internet Cache’ or ‘Cookies’.
Step 4. Configure Schedule, Wipe Options & Logging
Before clicking ‘OK,’ check the other tabs:
- ‘Schedule’ to set a specific start time for the task (at user logon, at startup, at user logoff) or task frequency (daily, weekly, monthly).
- ‘Wipe options’ to switch between wiping schemes – see all wiping schemes supported.
- ‘Log file’ to enable a logging function to record what was deleted.
Step 5. Start & Monitor the Wiping Process
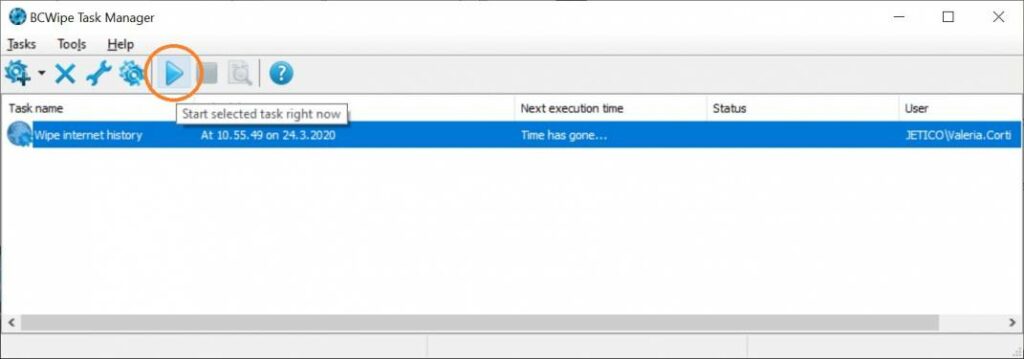
Now, click ‘OK’ and review the wiping process.
The task will start automatically at the scheduled time.
To start it immediately, click the ‘Play’ icon in the toolbar after the task has been created.
You can follow the progress in the ‘Status’ field.
Happy Wiping!
Frequently Asked Questions (FAQs)
Deleting history in the browser removes only what Brave displays, not the deeper traces stored on your system. Residual data such as cache fragments, cookies and autofill traces can still be recovered with forensic tools. Wiping overwrites this data so it cannot be restored.
BCWipe erases data remanence at the system level, including saved passwords, cookies, DNS traces, cache data and other leftover items Brave does not fully remove. You can also choose exactly which components to wipe for more precise privacy control.
It depends on your privacy needs. If you handle sensitive research, corporate information or use a shared device, scheduled wiping can be helpful. BCWipe lets you automate daily or weekly tasks so you do not have to remember them.
Only if you select those items. BCWipe gives you full control over what gets wiped so you can keep bookmarks or saved logins while removing sensitive data. Always review your task settings before running a wipe.
Yes. BCWipe can remove data remanence from multiple browsers including Chrome, Edge and Firefox.
*Disclaimer: Promotion valid only on Jetico’s Online Store for Standard Edition products, for a maximum quantity of 25 licenses. This offer cannot be combined with any other offers or promotions.
Related Articles
The Ultimate Guide to Securely Wiping Your Computer
How to Permanently Delete Files
How to Permanently Delete Files on SSD
How to Wipe Free Space
How to Permanently Wipe Files on Local History
How to Securely Wipe Your Windows 10 Computer Clean
How to for BCWipe