

Updated: 12 Aug 2026
Originally Published: 20 Aug 2025
NOTE: Independent testing has revealed that Windows 11 Recall’s “Filter sensitive information” feature still misses highly sensitive data, including credit card numbers, bank account balances, Social Security numbers and even passwords. Read more below
So, what should you do now? Until Microsoft fixes these flaws, the safest move is to disable Recall entirely, and BCWipe Privacy Guard lets you do that with one click.
How to disable Windows 11 Recall?
Since its announcement, Windows 11’s Recall feature has generated significant attention, primarily due to the privacy concerns it has raised.
In this blog, we will break down:
- What Windows 11 Recall is
- How to check if Recall is on your computer
- Privacy issues to be aware of
- Differences between pausing and disabling Recall
- How to disable the feature
- How to delete existing Recall snapshots
What Is Windows 11 Recall?
Recall, a new AI tool integrated into Windows 11 Copilot+ PCs, is designed to simplify your life by capturing snapshots of your activities. Every five seconds, Recall takes a snapshot of the screen whenever the content changes. These snapshots are then stored locally on your drive.
Recall includes a search bar and a timeline, allowing you to scroll back through the snapshots and view the screen content at specific times.
Is Windows Recall on My Computer?
Windows Recall is available only on Copilot+ PCs. Microsoft first previewed Recall with Windows Insiders on November 22, 2024 and later released it more broadly for Copilot+ PCs on April 25, 2025. Recall is not being provided as a software update for older Windows 10 or Windows 11 computers as it requires specific hardware, including an NPU for local AI processing. If your PC is not a Copilot+ model, you should not have this feature.
If you’re unsure whether your computer has the Recall feature, here’s an easy way to check:
- Open the Windows Start Menu
- Type ‘Recall’ in the search bar
– If you see the app, then the feature is installed on your device
– If nothing appears, then the feature is NOT installed on your device
What Are the Privacy Concerns with Windows 11 Recall?
Despite its convenience, Recall has raised significant privacy concerns related to how users’ sensitive data—such as passwords, personally identifiable information (PII) and financial information—will be protected from hackers. In general, security and privacy experts are worried about:
- How data is stored
- Who can access it
- Potential for misuse
To validate these concerns, researchers have already found ways of accessing data in Recall snapshots and have even released an open source tool to do so.
What Is Recall’s “Sensitive Information Filter”?
In response to the aforementioned privacy concerns, Microsoft has introduced a “Sensitive information filter”. This setting is designed to stop Recall from saving screenshots that contain private data like passwords, credit card details and bank account numbers.
However, the filter has significant limitations. If your sensitive details aren’t categorized in a way the filter expects, such as an unlabeled card number or a password that doesn’t contain the word “password” beside it, Recall will still capture them.
Recent independent testing confirmed Recall can still store:
- Full credit card numbers, expiration dates and CVC codes
- Password lists in plain text
- Bank account balances and transaction histories
- Social Security numbers or personal IDs without explicit labels
Finally, due to these screenshots being stored locally and only protected by your Windows Hello PIN, anyone with remote access tools like TeamViewer can potentially browse your entire Recall archive.
Pausing vs Disabling Recall: Why Disabling Is Better for Privacy
Windows Recall can be paused or disabled, but these 2 options do not provide the same level of protection.
- Pausing Recall is temporary. This option stops snapshots for a short time, but Recall remains active as a feature and can be resumed later. This can be useful if you only want to stop snapshots while working on something sensitive, but it is not a strong privacy control.
- Disabling Recall is the better option if you do not want Windows to keep recording your activity. When Recall is disabled, snapshot saving is turned off more deliberately. This setting reduces the chance that screenshots of documents, messages, websites or business data will continue to be captured in the background.
Overall, for privacy protection, disabling Recall is safer than pausing it. Pausing is a short-term option. Disabling stops Recall from continuing to save snapshots. After that, you should also delete or securely erase any snapshots already stored on the device.
How Can I Disable Windows 11 Recall?
Let’s explore 3 different options for disabling Windows 11 Recall:
- Disable Through Windows Settings (Windows 11 Home Edition)
Windows settings allow you to turn Recall on or off. If needed, you can also pause snapshots temporarily by selecting the pause option.
👍 Pros:
This function is already available within your system.
👎 Cons:
Toggling this setting off only stops Recall from taking new snapshots; it does not delete the data that has already been collected. Furthermore, this setting could potentially be re-enabled by a future Windows update. - Disable Recall Using Group Policy (Windows 11 Pro & Enterprise Editions)
For Windows 11 Pro, Enterprise and Education users, Group Policy provides a managed way to prevent Recall from saving snapshots. This function is useful for organizations that want to make sure users cannot turn Recall snapshot saving back on through Windows Settings.
👍 Pros:
Prevents users from re-enabling Recall snapshot saving through Windows Settings. Ideal for managed business devices.
👎 Cons:
Only available in Windows 11 Pro, Enterprise, and Education. Administrators should verify that the policy remains configured after major Windows feature updates as part of normal system management. - Use a Third-Party Tool
For a more comprehensive solution, consider using a third-party tool to manage all your privacy settings in Windows 11. Free tools like BCWipe Privacy Guard offer a simple interface that lets you disable Recall and other tracking features with a single click.
👍 Pros:
– Free tools like BCWipe Privacy Guard can disable Recall and all Microsoft’s default tracking features with one click, including activity tracking, location tracking, and targeted advertising.
– BCWipe Privacy Guard can track any tampering with your selected configuration by third-party tools or Windows itself. If Recall turns on automatically, you will receive a notification
– While Microsoft emphasizes that the security risks associated with Recall are lower due to the snapshots being stored only locally, security experts agree that such a database would be a prime target for ransomware and remote attackers. To minimize this risk, BCWipe Privacy Guard includes a feature to securely delete previously collected data from the local database.
👎 Cons:
You need to download and install the free tool.
Skip to step-by-step instructions
How to Disable Windows 11 Recall Through Windows Settings
Follow these steps to disable Recall through Windows settings:
- Open ‘Settings’
- Go to ‘Privacy & security’
- Select ‘Recall & snapshots’
- Toggle off ‘Recall’
How to Disable Recall Using Group Policy
Follow these steps to disable Recall using Group Policy:
- Press ‘Win + R’ to open the Run dialog, type ‘gpedit.msc’, and press Enter
- Navigate to ‘Computer Configuration’ > ‘Administrative Templates’ > ‘Windows Components’ > ‘Windows AI’
- In the right pane, find and double-click the policy named ‘Turn off saving snapshots for Windows’
- Select the ‘Enabled’ option to turn off the feature
- Click ‘Apply’ and then ‘OK’
- Restart your computer for the changes to take full effect
How to Disable Windows 11 Recall with a Third-Party Tool
We will use BCWipe Privacy Guard in the following step-by-step instructions, a free tool developed by the long-trusted data wiping developer Jetico.
- Download BCWipe Privacy Guard
- Launch BCWipe Privacy Guard by going to ‘Start’ -> ‘BCWipe Privacy Guard’
- Toggle on ‘Use Jetico recommended settings’
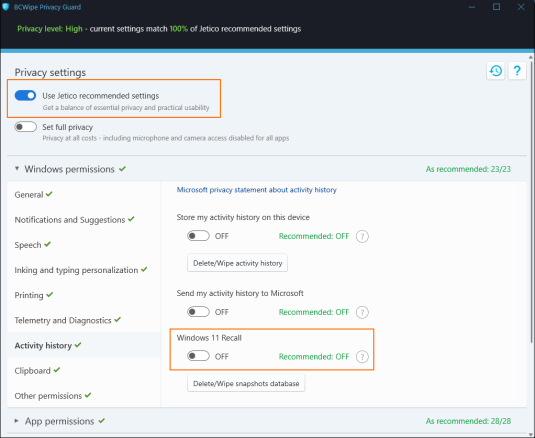
Jetico’s recommended settings disable the Recall feature by default, along with many other Windows tracking features, optimizing your privacy setup.
For expert users who want to fine-tune their settings, the Recall feature can be easily disabled by selecting ‘Activity history’ and turning off ‘Windows 11 Recall’.
How to Delete Existing Recall Snapshots
Disabling Recall stops new snapshots from being saved, but it does not always address snapshots that were already created. If Recall was previously enabled on your device, you should also remove the existing snapshot database.
You have 2 options: delete snapshots through Windows Settings or securely erase them with BCWipe Privacy Guard.
How to Delete Recall Snapshots in Windows Settings
Windows allows you to delete existing Recall snapshots directly from Settings. Microsoft’s current guidance says users can delete all snapshots or choose a specific timeframe, such as the past hour, 24 hours, 7 days or 30 days.
To delete Recall snapshots in Windows:
- Open ‘Settings’
- Go to ‘Privacy & security’
- Select ‘Recall & snapshots’
- Expand the ‘Delete snapshots’ section
- Choose whether to delete all snapshots or snapshots from a specific timeframe
- Select ‘Delete all’ or ‘Delete snapshots’
This removes the snapshots from Recall. However, standard deletion is not the same as secure erasure. Deleted data may still leave recoverable traces on the device until the storage space is reused or securely wiped.
How to Securely Erase Recall Snapshots With BCWipe Privacy Guard
For stronger protection, use BCWipe Privacy Guard to securely delete the Recall snapshot database.
In BCWipe Privacy Guard:
- Open BCWipe Privacy Guard
- Check that Recall is disabled
- Click ‘Delete/Wipe Snapshot Database’
- Choose ‘Secure wiping with BCWipe’
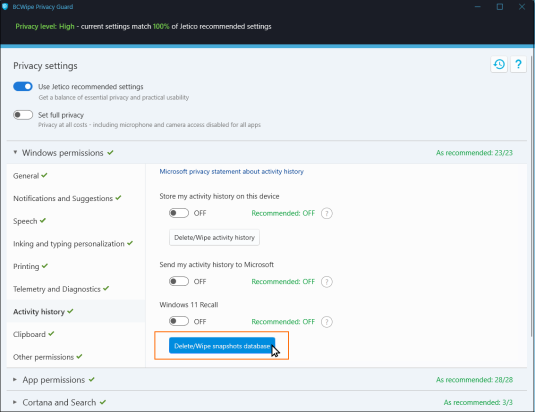
BCWipe Privacy Guard integrates with BCWipe, Jetico’s solution to wipe files, to remove the Recall snapshot database beyond forensic recovery. If BCWipe is not installed, you can download a free 21-day trial.
Why this matters: deleting removes access to the data through Windows, but secure erasure is designed to remove the data itself so it cannot be recovered.
What if You Already Used the Windows Delete Option?
If you already deleted Recall snapshots through Windows Settings, the next best step is to wipe free space with BCWipe. This additional step helps securely erase remnants of deleted data that may still exist in unused disk space.
How to Manage Windows 11 Privacy Settings Beyond Recall
While Microsoft has stated that Recall will no longer be enabled by default, understanding and managing your privacy settings remain essential. Windows 11’s history of data collection highlights the need for vigilant privacy management. BCWipe Privacy Guard offers an effective, user-friendly way to control your privacy settings.
BCWipe Privacy Guard is available as a free tool but is also integrated with BCWipe, a solution to wipe files and Data Remanence beyond forensic recovery. BCWipe enhances the capabilities of BCWipe Privacy Guard by enabling the secure erasure of data collected by Windows, including activity history, passwords, and credit card details.
Enhance your protection today, explore BCWipe and start your free trial now.
Summary: Your Action Plan for Recall
To better protect your privacy, do 2 things: disable Recall and remove the snapshot database.
Disabling Recall stops new snapshots from being saved. Removing the snapshot database helps clean up screenshots that may already exist on your device.
For stronger protection, use BCWipe Privacy Guard to securely erase the snapshot database. If you delete snapshots through Windows Settings instead, use BCWipe to wipe free space afterward because deletion is not the same as secure erasure.
Taking both steps helps stop new activity from being recorded and reduces the risk that old snapshots remain recoverable.
German version available here: Deaktivieren Sie Windows 11 Recall in 3 einfachen Schritten
Frequently Asked Questions (FAQs)
Windows 11 Recall is a Copilot+ PC feature that saves snapshots of your screen so you can search and return to things you previously viewed. Microsoft says Recall stores snapshots locally and requires users to opt in before snapshots are saved.
No. Recall is available only on supported Copilot+ PCs. It is not a general Windows 11 feature for older computers.
No. Microsoft says snapshot saving is not enabled by default and users must opt in before Recall starts saving snapshots. Even so, privacy-conscious users and organizations should still check Settings > Privacy & security > Recall & snapshots to confirm the status on supported devices.
The privacy concerns related to Windows 11 Recall come from what snapshots can contain: passwords, credit card numbers, account details, confidential documents and any other sensitive information that happens to be visible on screen. Microsoft has changed Recall since its 2024 launch – making it opt-in, adding a sensitive information filter and requiring Windows Hello authentication – but independent testing in August 2025 confirmed the filter still misses categories of data it was designed to catch. The underlying concern has not gone away.
Windows 11 provides settings that allow users to turn off Recall and control related data retention options. Disabling the feature helps reduce unnecessary data collection, especially on systems used for sensitive work. Users should verify that the feature is fully disabled after making changes.
No. Pausing Recall only puts snapshot saving on hold. Disabling Recall is stronger because it stops Recall from continuing to save snapshots.
No. Disabling Recall stops new snapshots from being saved, but it should not be treated as a cleanup step for snapshots that may already exist. After disabling Recall, delete or securely erase the snapshot database.
You can delete existing Recall snapshots in Windows Settings under Privacy & security > Recall & snapshots. However, deletion is not the same as secure erasure. Standard deletion removes snapshots from normal access, while secure erasure is designed to remove recoverable traces from the device.
For stronger protection, use BCWipe Privacy Guard to securely erase the snapshot database. If you use the Windows delete option, wipe free space afterward with BCWipe.