
Create Protection Policies for Your Active Data with Our New
Cybersecurity Tool
Did you know that data is more vulnerable to cyberattacks when it’s in use? Typically, active data is unencrypted
and accessible – and likely defenseless against targeted attacks.
So how do you protect data in use? You must somehow control which users or processes can access your data. BestCrypt Data Shelter, Jetico’s new cybersecurity tool, provides a set of rules to decide who or what may access data in selected folders. Using our solution, you can easily create protection policies for your active data.
In this blog, we will first instruct you how to create your first protection policy. Then we will provide a 3-step guide on how to create a list of trusted programs for your protection policy by analyzing the types of files in the folder.
How to Create Your First Protection Policy
Step 1: Getting Started
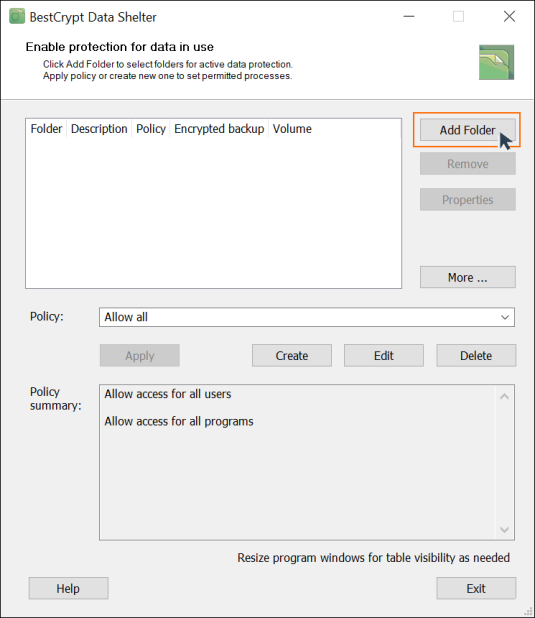
- Launch BestCrypt Data Shelter
- Click ‘Add folder’ and select the folder you want to protect
- Under the ‘Policy’ section, click ‘Create’
- Create a name for your new policy
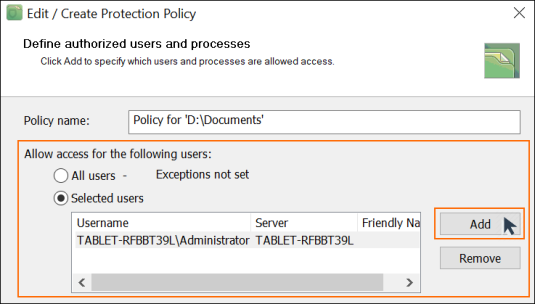
Step 2: Select Users
Now you can select which users will be allowed access to your protection policy. There are 2 different ways of doing this, both outlined below:
- Under ‘Allow access for the following users’, select ‘All users’
- Click ‘Exceptions not set’ to create a list of users that will be denied access to your protected folder
- You can see a list of all the users registered on your computer by clicking ‘Add’
- Select which users you want to add to the exclude list
- Click ‘Ok’
- Under ‘Allow access for the following users’, choose ‘Selected users’
- Click ‘Add’ to see a list of all users registered on your computer
- Select which users may have access to your protected folder
- Click ‘Ok’
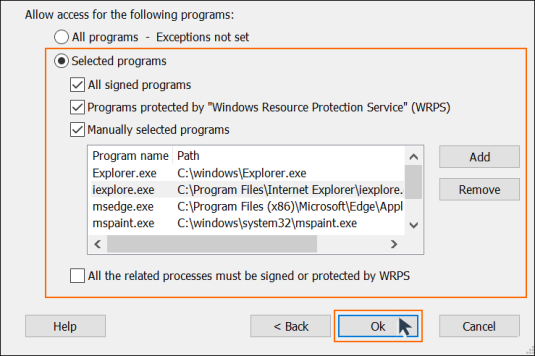
Step 3: Select Programs
Making a list of trusted programs for your protection policy works the same as with selecting users. One way is to first allow all programs to access your protected folder and then set the list of exceptions by clicking ‘Exceptions not set’. Or you can explicitly select which programs will be granted access by clicking ‘Selected programs’.
- Once you have selected the trusted programs for your protection policy, click ‘Ok’ at the bottom of the ‘Edit / Create Protection Policy’ window
- For now, ignore the 4 checkboxes under ‘Allow access for the following programs’; they can be edited later
- Your protection policy is now ready
To use your new protection policy, follow these steps:
- Click ‘Add folder’
- Select the folder you want to protect
- Under ‘Folder properties’, click ‘Set policy’
- Under ‘Select pre-set policy’, choose your newly created policy from the dropdown list
- Confirm the selection by clicking ‘Ok’
Define Your Protection Policy
You have created a basic protection policy and now you can use BestCrypt Data Shelter to modify the list of programs that are denied entry to your selected folder. Alternatively, you can manually select programs by going through the advanced settings that we previously skipped under ‘Allow access for the following programs’.
You have 3 options:
- Create a list of programs based on file types.
BestCrypt Data Shelter will scan all files in your selected folder. You will then see a list of programs that are registered by Windows to be associated with the files within the folder. - Create a list of programs based on folder history.
For a set period of time (hour, day, week), the software will monitor which programs access your folder while you work with files normally. Based on the information that BestCrypt Data Shelter provides, you can then decide which programs should continue accessing your folder and deny access to any new or unfamiliar programs. Review step-by-step instructions - Manually select programs.
Your computer may have dozens or even hundreds of programs installed. We recommend that only more advanced users select this option.
We now focus on the first option because creating a list of programs based on file types offers a quick way of ensuring data will be safe from untrustworthy processes. Please check the following step-by-step instructions to learn how to select programs for your protection policy.
How to Create a List of Programs Based on File Types
Step 1: Getting Started
- Click ‘Add folder’ and select the folder you want to protect
- Select ‘Properties’ in the main window of BestCrypt Data Shelter
- Click ‘Set policy’ in the ‘Folder Properties’ dialog window
To create a new policy for the chosen folder, BestCrypt Data Shelter will show the following window:
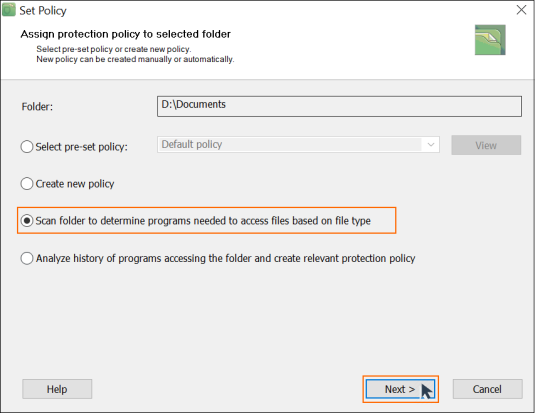
- Click ‘Scan folder to determine programs needed to access files based on file type’
- Click ‘Next’
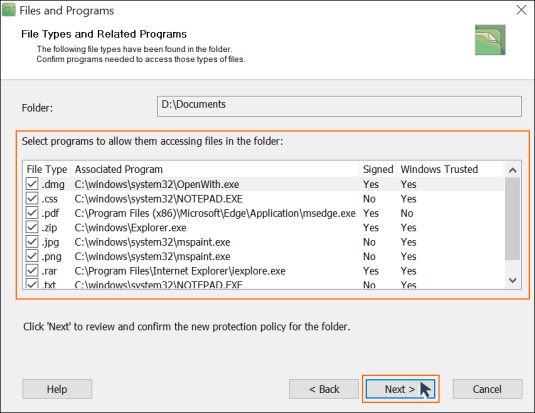
BestCrypt Data Shelter will determine the different types of files in the folder and get information from the operating system about which programs are associated with these files.
Step 2: Scan Your Folder
After the scan is finished, a dialog window will appear that shows a list of file extensions of all files in the folder and the associated programs.
- Confirm which programs are able to access specific file types:
1. Deselect the programs that you don’t want accessing this folder
2. Leave the programs that will be able to access the folder - Click ‘Next’ to proceed with creating the protection policy
- Confirm the selection by clicking ‘Next’
Note: As different file extensions can be associated with the same program, individual programs can appear several times in the list. BestCrypt Data Shelter will only include such programs once in protection policies.
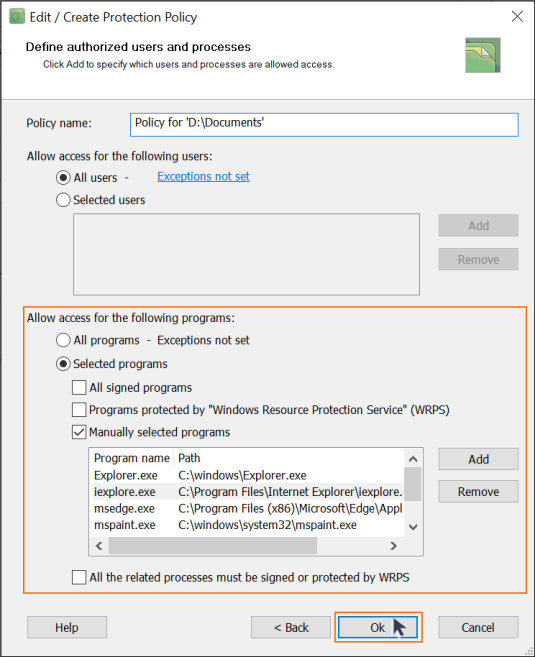
Step 3: Create Protection Policy
BestCrypt Data Shelter will display the same dialog window that appears when you manually create a protection policy. Now, however, it features the list of programs based on file types and includes recommended options.
You can now edit the policy if you wish
- See the section, ‘Allow access for the following programs’
- Make sure you only select the checkbox for ‘Manually selected programs’
- Click ‘Ok’ to save and apply the protection policy to your selected folder
Note: If you leave these boxes unchecked, more programs will gain access to your folder.
When you select ‘All the related processes must be signed or protected by WRPS’, BestCrypt Data Shelter will be able to check the entire chain of processes to make sure that nothing harmful is able to access the protected folder.
By following the above steps, you have built a list of trusted programs based on file types. Your newly created protection policy will ensure data in your selected folder is safe. You can now rest assured that data stored in your folder will be secure even when it’s in use.
Learn more about BestCrypt Data Shelter and download the free tool.
BestCrypt Data Shelter is also integrated with all BestCrypt products. For users of BestCrypt Volume Encryption, you will receive additional information about encrypted disk volumes and gain time-saving encryption options through BestCrypt Data Shelter.