BCWipe logs and alerts
BCWipe Enterprise with Jetico Central Manager offers Administrators a quick way to identify and respond to any errors and warnings occurring.
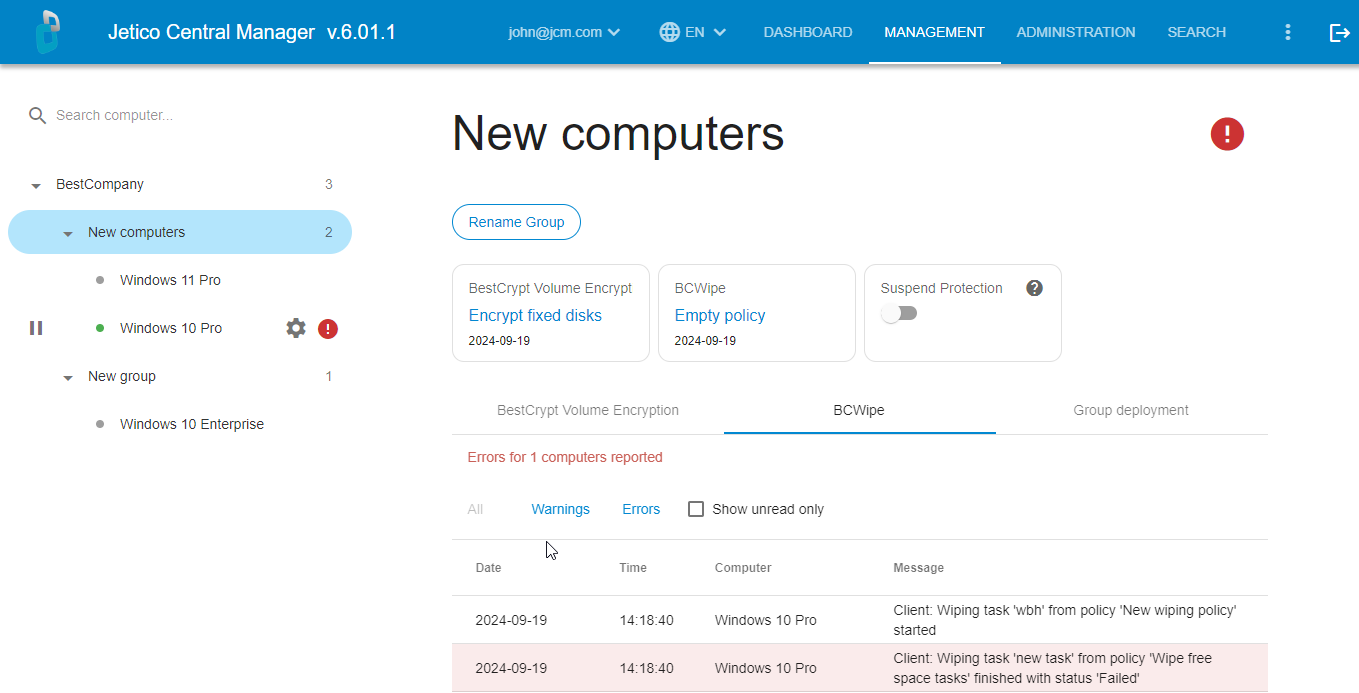
To get a quick overview, select a group in the left panel.
The icon at the top right corner of the group page indicates current status of that group:
|
|
Green. Everything is in order. No action required. |
|
|
Yellow. Warnings reported for some client PCs. Check the computer page(s) for details. |
|
|
Red (excl.). Errors reported for some client PCs. Check the computer page(s) for details. |
When the status is green, you may relax and sit back, BCWipe has you covered.
Should there be any errors or warnings requiring your attention, the group status icon will change to red or yellow.

Here are 3 simple steps to pinpoint and address the problem:
Step 1. Identify the client PC that reported the error or the warning.
On the Group Page, under Group settings, check the status field for BCWipe. Click on the message "Errors / warnings reported for X computers". This will automatically redirect you to the Group Activity log filtered to show the error messages. An error / warning string typically looks like this:

It will include :
- The date and time when the error was reported.
- The name of the computer the error was reported at.
- The message itself including a suggestion on how to resolve the problem.
In addition, the computers reporting errors \ warnings are marked in the list with these icons:
 - for computers reporting errors
 - for computers reporting warnings
Once the computer reporting errors / warnings has been identified, we can move to the next step.
Step 2. View detailed info on the Computer Page.
In the list of computer and groups, click on the computer identified at step 1 to open selected Computer Page.

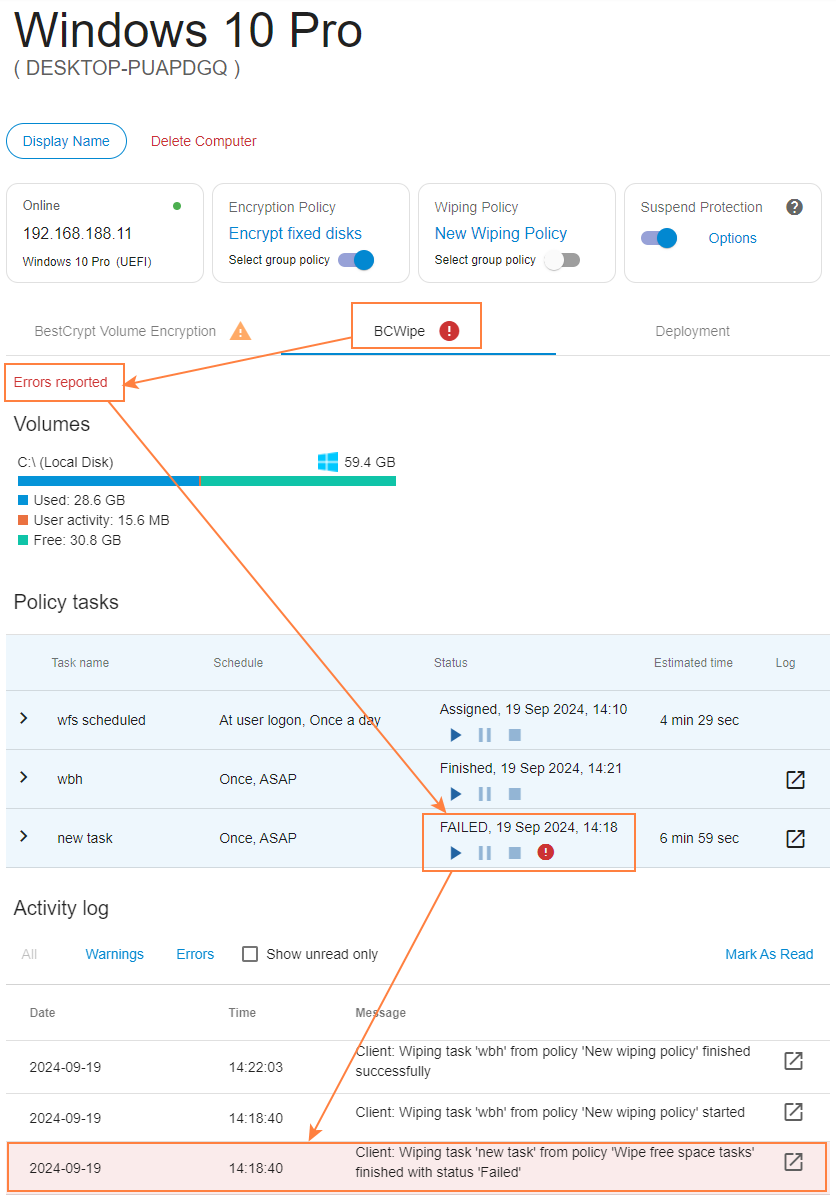
Similar to the Group Page, the icon at the top left corner of the Computer Page indicates current status of the computer. Should there be any errors or warnings requiring your attention, the Status filed will display "Errors / warnings reported". Clicking on that message will redirect you to the Activity log filtered to show the error messages.
In addition, the wiping task reporting errors \ warnings are marked in the Policy Tasks table with these icons:
 - for tasks reporting errors
 - for tasks reporting warnings
The error message will typically suggest how to resolve the problems. It might require restarting the client PC or relaunching the task manually.
Other errors might require analyzing the problem in even more detail. The log file is a perfect tool for that.
Step 3. Analyze the log file for the wiping task reporting errors / warnings.
In the Policy Tasks table, expand the wiping task that has been identified as the one reporting errors / warnings at the previous step.
In the expanded view, the elements are marked with the following icons:
✓ — The element was wiped
🞈 — Wiping in progress
- — The element couldn't be wiped.
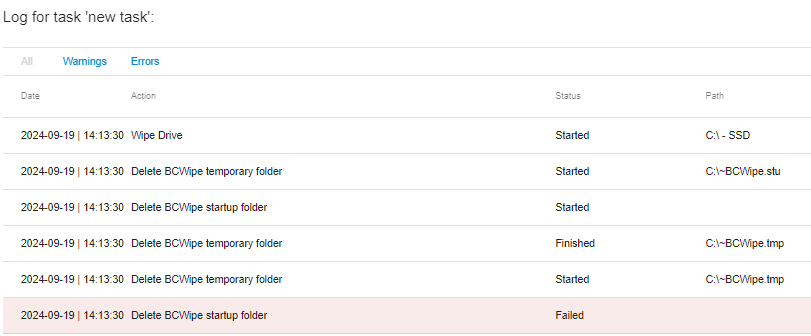
When an element couldn't be wiped, view the log file to see the details. To open the log file, click "Show log" next to the selected task. The log files opens in the new window:

Similar to the Activity log, you can filter the Wiping log to only show Warnings or Errors.

To view more details about a certain event in the wiping log, select a string by clicking on it. This will open a message with the error details:

After viewing the details in the Error field, you can navigate to the client PC to resolve the problem. For example, in the situation illustrated on the screenshot above, you could attempt to close any processes locking the target file and run the wiping task again.
Some errors like errors while wiping file and directory slacks are not critical and can be ignored. For example, if a file is currently in use, the system might deny opening it for slack wiping. These error will be listed in the Wiping log, but won't result in the overall status of the wiping task being set to Failed.
Other errors, like not being able to wipe one of the target files will result in the status of the task being set to Failed. Generally, if the status of the task is "Completed", any errors reported are non-critical and can be ignored.


